How to Integrate RazorPay Payment Gateway in React Native
Razorpay is a popular payment gateway among developers, especially in India. In this react native tutorial, let’s check how to add the Razorpay payment gateway in your react native project.
I assume you have an account with Razorpay. Get test API keys from Settings > API Keys. Real money is not used when you use test APIs.
Razorpay has its own official react native library. You can install react native Razorpay library into your project using any of the following commands.
npm install --save react-native-razorpayor
yarn add react-native-razorpayIf you are an iOS user then don’t forget to run pod install.
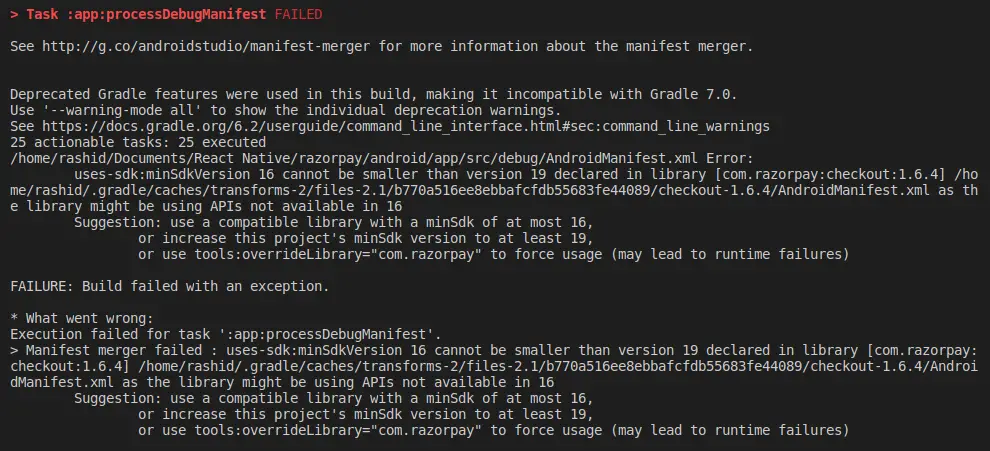
Android users should change minSdkVersion to 19. You can do this by opening YourProject/android/build.gradle file as given below.
ext {
        buildToolsVersion = "29.0.2"
        minSdkVersion = 19
        compileSdkVersion = 29
        targetSdkVersion = 29
    }
Otherwise, you will get an error as given in the following screenshot.
Now, let’s move to the coding part.
First of all you have to import RazorpayCheckout.
import RazorpayCheckout from 'react-native-razorpay';Next, you should have a JavaScript object with all details of transaction. You have to pass your test API key as value to the key.
let options = {
    description: 'Online Fee',
    image: 'https://i.imgur.com/3g7nmJC.png',
    currency: 'INR',
    amount: '25000',
    key: 'your API Key',
    name: 'Test',
    prefill: {
      email: 'test@email.com',
      contact: '9191919191',
      name: 'ReactNativeForYou',
    },
    theme: {color: '#528FF0'},
  };
Note that the amount 25000 means Rs 250.00. The last two digits are assigned for paise.
You can invoke RazorpayCheckout to do payment.
RazorpayCheckout.open(options)
      .then((data) => {
        // handle success
        Alert.alert(`Success: ${data.razorpay_payment_id}`);
      })
      .catch((error) => {
        // handle failure
        Alert.alert(`Error: ${error.code} | ${error.description}`);
      });
Following is the complete react native Razorpay example.
import React from 'react';
import {Button, StyleSheet, Alert, View} from 'react-native';

import RazorpayCheckout from 'react-native-razorpay';

const App = () => {
  let options = {
    description: 'Online Fee',
    image: 'https://i.imgur.com/3g7nmJC.png',
    currency: 'INR',
    amount: '25000',
    key: 'yourKey',
    name: 'Test',
    prefill: {
      email: 'test@email.com',
      contact: '9191919191',
      name: 'ReactNativeForYou',
    },
    theme: {color: '#528FF0'},
  };

  const onPressButton = () => {
    RazorpayCheckout.open(options)
      .then((data) => {
        // handle success
        Alert.alert(`Success: ${data.razorpay_payment_id}`);
      })
      .catch((error) => {
        // handle failure
        Alert.alert(`Error: ${error.code} | ${error.description}`);
      });
  };

  return (
    <View style={styles.container}>
      <View style={styles.buttonContainer}>
        <Button onPress={() => onPressButton()} title="Press Me to Pay" />
      </View>
    </View>
  );
};

const styles = StyleSheet.create({
  container: {
    flex: 1,
    justifyContent: 'center',
  },
  buttonContainer: {
    margin: 20,
  },
  alternativeLayoutButtonContainer: {
    margin: 20,
    flexDirection: 'row',
    justifyContent: 'space-between',
  },
});

export default App;
Following is the output.
This is a bare minimum example and you can learn more about Razorpay features here.